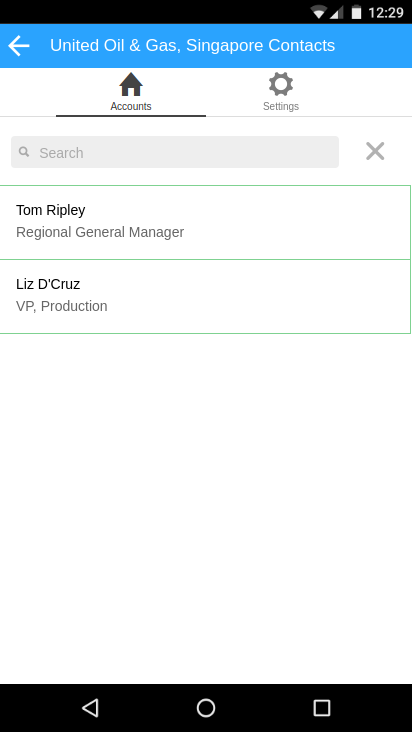
In this module we will add a detail page for each account. This page will list the contacts associated with the account.
Step 1 : The Accounts Detail Page
- Create a new template file with the following contents. This file shall be our base detailed account page. Save it as www/templates/account.html
123456789101112131415<ion-view cache-view="false"><ion-nav-title>{{::vm.account.Name}} Contacts</ion-nav-title><ion-nav-buttons side="right"><mc-sync-spinner></mc-sync-spinner></ion-nav-buttons><ion-content></ion-content></ion-view>
Note.
1. By default, Ionic views are cached, which means the associated controller code is only run once. In order for the controller code to be run every time we navigate to the url we use the cache-view=”false”. This will be useful later on when we add a new contact and want the list to refresh and include the newly added contact.
2. We have again added our ion-nav-bar and mc-sync-spinner tags to give us our connection/sync icon in our page’s header
3. We’re using an alternate way of implementing the navigation title (using the ion-nav-title tag) – this is so that we can dynamically set this from our controller.
4. We’re using the double-colon notation to apply angular’s one-time-binding to the vm.account.Name. We’re doing this as this value won’t change after the initial setting, and using one-time-binding gives us slight performance improvements through the reduction of watchers in our app. - Add the following highlighted line to our existing accounts.html template file. This will make each account entry a link.
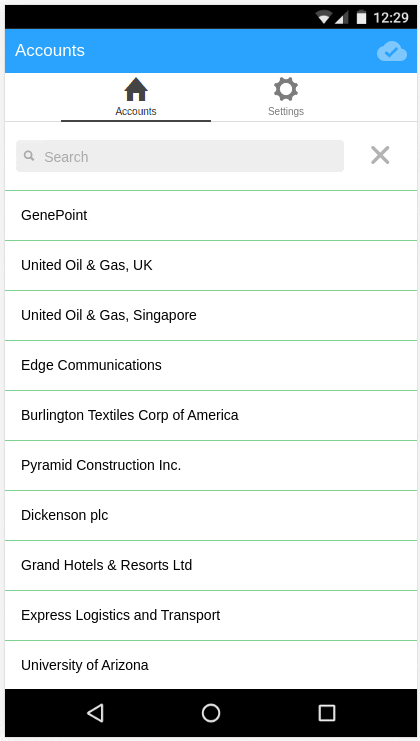
161718192021<ion-item class="item"collection-repeat="account in vm.accounts | filter:vm.search.query" type="item-text-wrap"href="#/tab/account/{{account.Id}}"> - Add the following to our www/js/app.js to make our links route to our new detailed page. Note that we use :accountId which makes the value in this position available to our controller. Again we are setting the controller to be used, and using the Controller As syntax, as mentioned earlier on in the tutorial.
103104105106107108109110111112113114115116// the router info for our account's details page// Note we have a "accountId" state param available to our angular code.state('tab.accounts-detail', {url: '/account/:accountId',views: {'accounts-tab': {templateUrl: RESOURCE_ROOT + 'templates/account.html',controller: 'AccountCtrl',controllerAs: 'vm'}}}) - Now we create a new controller to hook our new view up to our data. Create a new file called account.controller.js in our www/js/controllers directory to handle this detailed account page.This page follows the same skeleton as our AccountsCtrl controller but it’s s little simpler. Our activate() method this time only calls the get() function exposed (or will be) by our AccountsService service, and then applies the resulting object to our scope through vm.account. It is this value that will be bound and shown in the title of our account.html template through {{::vm.account.Name}}.
123456789101112131415161718192021222324252627282930313233343536373839404142/*** Accounts Controller** @description description*/(function() {'use strict';angular.module('starter.controllers').controller('AccountCtrl', AccountCtrl);AccountCtrl.$inject = ['$stateParams', 'logger', 'AccountsService'];function AccountCtrl( $stateParams, logger, AccountsService) {var vm = this,logTag = "AccountCtrl";activate();/*** @function activate* @description Activates our view - gets an account's details'* @return {[type]} [description]*/function activate() {AccountsService.get($stateParams.accountId).then(function(account) {vm.account = account;}, function(e) {logger.error(logTag, e);});}}})(); - Add a get method to our AccountsService (in www/js/services/accounts.service.js) to handle the request for information about a single account.
14151617181920212223242526272829303132333435363738394041function AccountsService(devUtils, logger, UserService) {return {all: all,get: get};/*** @function get* @description Gets an account by it's ID* @param {string} id Id of our account* @return {promise} resolves to an account object*/function get(id){return new Promise(function(resolve, reject) {var smartSql = "SELECT * from {Account__ap} WHERE {Account__ap:Id} = '" + id + "'";devUtils.smartSql(smartSql).then( function(resObject) {resolve(resObject.records[0]);}).catch(function(resObject){reject(resObject);});});}......
This new method takes an account ID as an argument and then uses the MobileCaddy smartSql API call to run a SOQL query against our Account__ap table. We expect an array of records to be returned from the smartSql call, but actually we will only take the first result (in fact there should only be one) and we resolve our promise with this object.
If we reload our page we should now be able to navigate between our list of contacts and a detail page for each. At the moment our detailed page will only show the name of the account in the title bar.
Step 2 : Listing our Contacts
You are now going to update out account detail page to include a list of contacts.
- Add the following to your account.html template file. This should be added between ion-content tags.Here we are adding a list of contacts through the collection-repeat functionality, in the same way we listed our accounts earlier. This time we are setting a controller explicitly for our list, and exposing this through the Controller As syntax. This gives us a child scope available through the vmc.As with our accounts listing we are again adding a search input and binding this to our scope to allow for on-the-fly search results.
567891011121314151617181920212223<ion-list ng-controller="ContactsCtrl as vmc"><div class="item-input-inset"><label class="item-input-wrapper"><i class="icon ion-search placeholder-icon"></i><input type="search" placeholder="Search" ng-model="vmc.search.query"></label><button class="button button-clear icon ion-close-round" ng-click="vmc.clearSearch()"></button></div><ion-item class="item mti-item"collection-repeat="contact in vmc.contacts | filter:vmc.search.query" type="item-text-wrap"><h3>{{contact.Name}}</h3><p>{{contact.Title}}</p></ion-item></ion-list> - Again we need to add a new controller to hook up our view to actual data. Add a new file called contacts.controller.js to our www/js/controllers directory.This controller matches the one set in in the ng-controller in our template above.The structure of the controller should now be a bit familiar. In this case our activate function is calling a getForAccount method on a ContactsService. We’ll write this service in a moment and it will return an array of contact objects. We assign this array to our vmc.contacts.As with our accounts listing we have also implemented the code needed to support the search feature.
012345678910111213141516171819202122232425262728293031323334353637383940414243444546474849505152/*** Contacts Controller** @description description*/(function() {'use strict';angular.module('starter.controllers').controller('ContactsCtrl', ContactsCtrl);ContactsCtrl.$inject = ['$scope', '$stateParams', 'ContactsService', 'logger'];function ContactsCtrl($scope, $stateParams, ContactsService, logger) {var vmc = this,logTag = "ContactssCtrl";vmc.search = {};// exposed functionsvmc.clearSearch = clearSearch;activate();function activate(){// Request contact details from our ContactsService. We are passing in// the accountId, taken from the URL (stateparams) as in our app.jsContactsService.getForAccount($stateParams.accountId).then(function(contacts) {vmc.contacts = contacts;$scope.$apply();}).catch(function(e) {logger.error('error', e);});}/*** @functionclearSearch* @description clears search box*/function clearSearch () {vmc.search.query = "";}}})(); - We haven’t yet got a ContactsService, so go ahead and create a file called contact.service.js in your www/js/services directory.To this add the following code that handles the getForAccount function that we are calling from the new controller we have just created above.We are exposing the method we require and are using the smartSql call exposed by MobileCaddy to run a SOQL command on our date, to retrieve the list of contacts associated with the accountId that we passed in.
123456789101112131415161718192021222324252627282930313233343536373839404142/*** Contacts Factory** @description description*/(function() {'use strict';angular.module('starter.services').factory('ContactsService', ContactsService);ContactsService.$inject = ['devUtils', 'logger'];function ContactsService(devUtils, logger) {return {getForAccount: getForAccount};/*** @function getForAccount* @description Gets contacts for an account ID* @param {string} id Id of our account* @return {promise} resolves to an array of contacts object*/function getForAccount(accountId){return new Promise(function(resolve, reject) {var smartSql = "SELECT * from {Contact__ap} WHERE {Contact__ap:AccountId} = '" + accountId + "'";devUtils.smartSql(smartSql).then( function(resObject) {resolve(resObject.records);}).catch(function(resObject){reject(resObject);});});}}})(); - The final thing we need to do is to make sure that we sync the Contact__ap table upon startup so that we pull down the data from SFDC. As with the Account__ap table we can quite easily add this to the configuration in our SyncService.
192021222324252627282930// This is where you put your list of tables that you want from the platformvar appTables = [{'Name': 'Account__ap', 'syncWithoutLocalUpdates': true, 'maxTableAge' : fourHours},{'Name': 'Contact__ap', 'syncWithoutLocalUpdates': true, 'maxTableAge' : fourHours}];var appTablesSyncNow = [{'Name': 'Account__ap', 'syncWithoutLocalUpdates': true, 'maxTableAge' : 0},{'Name': 'Contact__ap', 'syncWithoutLocalUpdates': true, 'maxTableAge' : 0}];
If you now reload and navigate to an account detail page you should see the relevant contacts listed