In this module we will create a page for inputting the details for a new contact for an account. We will cover:
- Adding Ionic navbar buttons
- devUtils.insertRecord function
Step 1 : Creating the Add New Contact page
In this step we will create a new template and make changes to our existing account detail page to add an Add new contact button (in the navigation bar), and add the routing in to tie these together.
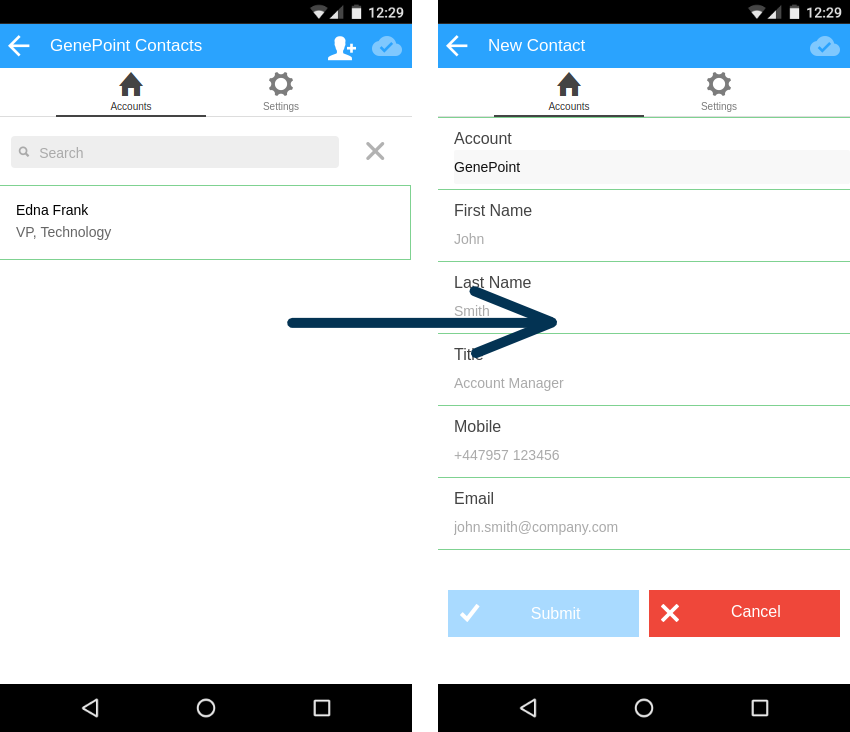
- Create a new template called contactNew.html with the following content. This is essentially the input form for our new contact. Note how we are using ng-disabled to make sure our submit button is disabled until a certain level of validation has taken place.It can also be seen that we are again using the ng-controller directive to give our form a child scope handled by the ContactNewCtrl controller. We will add this controller code later in this chapter.It can also be seen that we are pre-populating the Name of the Account for the contact to be added to through the parent scope via {{::vm.account.Name}}
12345678910111213141516171819202122232425262728293031323334353637383940414243444546<ion-view title="New Contact"><ion-nav-buttons side="right"><mc-sync-spinner></mc-sync-spinner></ion-nav-buttons><ion-content><form name="contactForm" ng-controller="ContactNewCtrl as vmc" ng-submit="vmc.addContact()"><div class="list"><label class="item item-input item-stacked-label"><span class="input-label">Account</span><input type="text" disabled value="{{::vm.account.Name}}"/></label><label class="item item-input item-stacked-label"><span class="input-label">First Name</span><input type="text" ng-model="vmc.c.FirstName" placeholder="John" required/></label><label class="item item-input item-stacked-label"><span class="input-label">Last Name</span><input type="text" ng-model="vmc.c.LastName" placeholder="Smith" required/></label><label class="item item-input item-stacked-label"><span class="input-label">Title</span><input type="text" ng-model="vmc.c.Title" placeholder="Account Manager" /></label><label class="item item-input item-stacked-label"><span class="input-label">Mobile</span><input type="number" ng-model="vmc.c.MobilePhone" placeholder="+447957 123456" /></label><label class="item item-input item-stacked-label"><span class="input-label">Email</span><input type="email" ng-model="vmc.c.Email" placeholder="john.smith@company.com" required/></label></div><div class="row"><div class="col"><button class="button-full button icon-left ion-checkmark button-positive {{submitAllowedClass}}" ng-disabled="contactForm.$invalid">Submit</button></div><div class="col"><a class="button-full button icon-left ion-close button-assertive" href="#/tab/account/{{vm.account.Id}}">Cancel</a></div></div></form></ion-content></ion-view> - Add the following state definition to your www/js/app.js to add the routing in for this new add contact URI. This can be added after the entry for the tab.accounts-contact-detail state we added earlier.
1234567891011121314// the router info for our contact page// Note we have a "accountId" state param available to our angular code.state('tab.accounts-contactNew', {url: '/account/:accountId/contact',views: {'accounts-tab': {templateUrl: RESOURCE_ROOT + 'templates/contactNew.html',controller: 'AccountCtrl',controllerAs: 'vm'}}}) - Modify your account.html template, adding the following highlighted lines. This will add an Add Contact icon button to our navbar for this page.
123456789101112<ion-view cache-view="false"><ion-nav-title>{{::vm.account.Name}} Contacts</ion-nav-title><ion-nav-buttons side="right"><a href="#/tab/account/{{::vm.account.Id}}/contact" class="button button-icon icon ion-person-add"></a><mc-sync-spinner></mc-sync-spinner></ion-nav-buttons>
If you reload your app now you should see a nice Add Contact button in the navbar when viewing an accounts detail page, and clicking this will take you to our new contact page.
Step 2 : Handling the form input and syncing with Salesforce
In this step we will add our controller logic to take the form input and add the functionality to our services to store this locally, for offline support, and to sync with the Salesforce platform.
- Create a new controller called ContactNewCtrl in a www/js/controllers/newContact.controller.js. And populate it with the code below.This controller exposes one function called addContact, that is called from our input form submission. This function shows a “Saving” dialogue, creates a contact object and then calls our ContactService.add function, passing this object in. If this call resolves then we hide our dialogue and return to the page that shows the list of accounts for our current account. This page should also now show our newly added contact.
12345678910111213141516171819202122232425262728293031323334353637383940414243444546474849505152535455565758/*** Accounts Controller** @description description*/(function() {'use strict';angular.module('starter.controllers').controller('ContactNewCtrl', ContactNewCtrl);ContactNewCtrl.$inject = ['$scope', '$stateParams', '$ionicPopup', '$ionicLoading', '$location', 'logger','ContactsService'];function ContactNewCtrl( $scope, $stateParams, $ionicPopup, $ionicLoading, $location, logger, ContactsService) {var vmc = this,logTag = "ContactNewCtrl";vmc.c = {};// exposed functionsvmc.addContact = addContact;function addContact(){// Grab the accountId from the parent scope (AccountCtrl)vmc.c.AccountId = $scope.vm.account.Id;// Make our Name field from our FirstName and LastName fieldsvmc.c.Name = vmc.c.FirstName + ' ' + vmc.c.LastName;$ionicLoading.show({template: '<p>Saving contact...</p><ion-spinner/>',animation: 'fade-in',showBackdrop: true,duration: 30000,delay : 400});ContactsService.add(vmc.c).then(function(res) {$ionicLoading.hide();$location.path('/tab/account/' + $stateParams.accountId);}).catch(function(e) {logger.error('addContact failed',e);$ionicLoading.hide();var alertPopup = $ionicPopup.alert({title: 'Add Contact Failed!',template: '<p>Sorry, something went wrong.</p><p class="error_details">Error: ' +e.status + ' - ' + e.mc_add_status + '</p>'});});}}})(); - Add an add function to your ContactsService in www/js/services/contacts.service.js as below. This function calls the devUtils.insertRecord function with 2 arguments, the name of the mobile table and the object we wish to add.If the contact is added successfully then our service calls the SyncService.syncAllTables, that in turn requests that our a synchronisation call is made to the Salesforce platform. Note we are also injecting the SyncService into our service.
1415161718192021222324252627282930313233343536373839404142434445464748ContactsService.$inject = ['devUtils', 'logger', 'AccountsService', 'SyncService'];function ContactsService(devUtils, logger, AccountsService, SyncService) {var contact;return {add: add,get: get,getForAccount: getForAccount};/*** @function add* @description Adds a contact, c, through the MobileCaddy API. Following* a successful insert it also calls a sync to SFDC.* @param {object} c Our contact object* @return {promise} Resolves to a success, or rejects an error object3*/function add(c) {return new Promise(function(resolve, reject) {devUtils.insertRecord('Contact__ap', c).then(function(resObject){// perform background sync - we're not worried about Promise resp.SyncService.syncAllTables();resolve(resObject);}).catch(function(e){reject(e);});});}
We now have an app that can add contacts to accounts, even when offline.
Step 3 : Fix our offline-added contact detail page.
One issue has arisen now with our app. If we run it offline and then add a new contact and try to view the contact’s detail page we will get an error. This is because we are forming our URI based on the contact.Id, and in the case of a record that has been added locally only the Id field will be in the form of something called a Proxy_ID. One issue with ProxyIDs is that they contain non-safe characters for URIs. There is a small fix for this which involves parsing our contact.Id through a filter that encodes it.
- Add a filter definition to the start of your www/js/controllers/controllers.module.js file like this:
5678910111213141516171819(function() {'use strict';angular.module('starter.controllers', ['ionic'])/*** encodeUri filter - needed to encode MC_Proxy_IDs for use in URLs*/.filter('encodeUri', function() {return function(x) {return encodeURIComponent(x);};}) - Update your account.html template so that the href for each contact entry now uses our new filter.
131415161718<ion-item class="item mti-item"collection-repeat="contact in vmc.contacts | filter:vmc.search.query" type="item-text-wrap"href="#/tab/account/{{vm.account.Id}}/contact/{{contact.Id | encodeUri}}">
If you are using the tutorial-ionic-contact-explorer repo then you can get to this stage by checking out branch tutorial/5
With these extra change we can add contacts offline and view them without issue.