This guide will cover how to access a Sandbox or a Community (or a Sandbox Community) on a container application.
Versions
No version restrictions.
This guide is for iOS, Android and Windows 10.
Prerequisites
This guide assumes you have:
- A container application that is installed on your target OS (iOS, Android, Windows)
- A Sandbox or Community endpoint that you can use to login to
Why
You may need to change your login host in a container app if the login host you require is not set as the initial login host. This could be during the development or QA phase when you need to login to a Sandbox or Community Sandbox.
How To
The steps are different depending on the OS that you are using. Follow the section for your OS below. The steps below assume that you have already downloaded and installed your container app on your device.
iOS
First, navigate to the settings for your container app by:
- Open the Settings app from your home screen
- Scroll down to find your container application’s name in the list of installed applications
If you know that the login host you require is part of the pre-set login hosts available:
- Tap on “Login Host”
- Select the required login host from the list available
- Open your container app
Otherwise, if the login host you require is not part of the pre-set login hosts:
- Tap on “Login Host”
- Select “Custom Host”
- Return to the previous screen by pressing the back button in the top left
- Underneath the “Login Host” button is a text field where you can specify your custom login host. Tap this box and enter the required login host (eg. myorg-developer-edition.eu11.force.com/mycommunity) Note: You should not add “https://” to the URL. This is done automatically by the container app.
- Open your container app
- You can now login using the correct credentials for this login end point
Android
First, navigate to the settings for your container app by:
- Open your container app
- At the top right, tap on the menu button
- Tap on “Change Server”
If you know that the login host you require is part of the pre-set login hosts available:
- Tap on the required login host from the list displayed
- Tap “Apply”
Otherwise, if the login host you require is not part of the pre-set login hosts:
- Tap on “Add Connection”
- Fill in the Name and the URL (eg. Name: “Test Community”, URL: myorg-developer-edition.eu11.force.com/mycommunity) Note: Unlike iOS, “https://” must be used
- Tap “Apply”
- Select the newly added login host from the list
- Tap “Apply”
You can now login using the correct credentials for this login end point
Windows 10
Windows 10 does not have a pre-set list of available login hosts available to configure, however, you can still specify a custom login endpoint. There are two ways you can set the login endpoint, the first method is useful for times where you may only want to launch the app once with an alternative endpoint and can be achieved through the use of the Windows Command Prompt. The second way is useful if you will be launching the app multiple times, or if you do not want your testers to have to go through the Command Prompt and is configured by editing the properties of the shortcut to your app.
via Shortcut Properties
- Find the shortcut on your desktop for your container app
- Right-click the shortcut, and click Properties
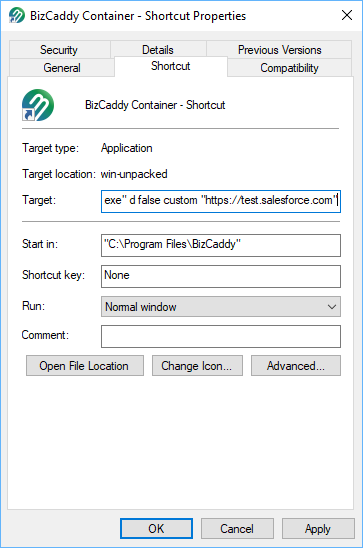
- In the Target text box, add the following to the end of the existing value to change your login endpoint to your desired endpoint:
123d false custom "https://myLoginEndpoint.my.force.com"
where “https://myLoginEndpoint.my.force.com” is the login endpoint that you want to use. For example, if your current Target text box contained
123"C:ProgramsMyAppMyApp.exe"
and you wanted to use https://myLoginEndpoint.my.force.com as your login endpoint, then you should update the Target to:
123"C:ProgramsMyAppMyApp.exe" d false custom "https://myLoginEndpoint.my.force.com"
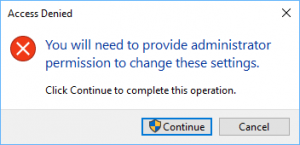
- Click Apply. If you are prompted to provide administrator permissions to change these settings, click Continue, or ask an administrator to complete this step for you.
- Click OK
- Launch your container app by double-clicking the shortcut on your desktop.

Note If you have multiple shortcuts or multiple places from which you can launch the app (for example the Start Menu or the Task Bar), each one should be updated if you wish to use the new endpoint from each shortcut.
To set the container app back to the original login endpoint, simply follow the steps above again but this time remove the changes you made so that your Target text box only contains the path for the executable.
via Windows Command Prompt
- Open the Command Prompt (CMD) application – you can find it by searching for “Command Prompt” from the Windows Start Menu
- Use the “cd” command to change directory to the location where you installed your container application, for example, for a container application called “MyExampleContainerApp” installed to the standard “Program Files” folder on the C:/ drive we would use the following command (including quotation marks): “cd C:Program FilesMyExampleContainerApp”
- Run the following command, changing the URL in the example with your required login host (Sandbox or Community) and changing the example container app name to your own container app name (including quotation marks): “MyExampleContainerApp.exe” d false custom “https://test.salesforce.com”
The application should now launch at the required login host. You can now login using the correct credentials for this login end point.
An example prompt is provided below:
|
1 2 3 4 5 |
C:UsersFrank>cd "C:Program FilesMyExampleContainerApp" C:Program FilesMyExampleContainerApp>"MyExampleContainerApp.exe" d false custom "https://test.salesforce.com" |
Note: If your container application has spaces in the name make sure to wrap the .exe file name with double quotation marks as in the above example. You should also wrap your url in double quotation marks too.