In this recipe we’ll add a feature to capture a signature using the Signature Pad library by szimek. Signature Pad is a small independent JavaScript library that uses the HTML5 canvas element.
This recipe will be based upon our Ionic powered Time and Expenses seed application, but could be applied to most JavaScript projects in a similar fashion. The seed application mentioned uses Salesforce.com as a backend and the MobileCaddy libraries to interact with it, but the principals below could be used within most projects.
Install and Integrate with Codeflow
As per our instructions on adding a dependency library add the package and add the appropriate Grunt task and Start Page references. In the case of the Signature Pad we have used npm to install it into our project like this;
|
1 2 3 |
npm install signature_pad --save |
The Code
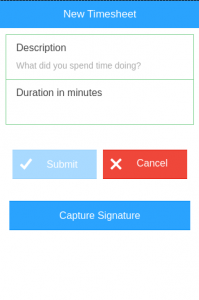
In order to capture a signature we’ll add a simple modal form to our existing data input process. In our case we have an input form for capturing expense details, this is the flow in which we will add our signature pad.
- Add a signature capture modal form
- Update our existing New Expense form to open the modal
- Add controller code to manage the signature capture functionality
- Add controller code to save the signature to the database
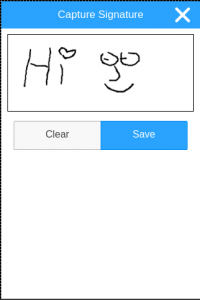
Add the signature capture modal form
Create a new file called signature.html (within your templates folder) and add the following code:
|
1 2 3 4 5 6 7 8 9 10 11 12 13 14 15 16 17 |
<ion-modal-view> <ion-header-bar class="bar-positive"> <h1 class="title">Capture Signature</h1> <button class="button button-icon icon ion-close-round" ng-click="closeSignatureModal()"></button> </ion-header-bar> <ion-content scroll="false" padding="true"> <div class=""> <canvas id='signatureCanvas' class="padding-horizontal" style="width: 100%;border: 1px solid black;"></canvas> <div class='button-bar padding'> <a class='button button' ng-click='clearCanvas()'>Clear</a> <a class='button button-positive' ng-click='saveCanvas()'>Save</a> </div> </div> </ion-content> </ion-modal-view> |
Update our input form to show the modal
Add the following code to the input form where you want to capture the signature. In our example project we modify the projectTimeExpNew.html file (just above the </ion-content> tag). This code will currently only be displayed for an Expense type record (not Time):
|
1 2 3 4 5 6 7 8 |
<div class="col"> <button class="button-full button button-positive" ng-click="showSignatureModal()">Capture Signature</button> </div> <div class="col" ng-show="signature"> <img ng-src="{{signature}}" style="width:100%;" /> </div> |
Add controller code to manage the signature capture
Within your contoller that handles the input form data (in our case the ‘ProjectExpNewCtrl’ controller), add the following code.
More code examples can be found within the installed NPM package ‘node_modules\signature_pad\example’:
|
1 2 3 4 5 6 7 8 9 10 11 12 13 14 15 16 17 18 19 20 21 22 23 24 25 26 27 28 29 30 31 32 33 34 35 36 37 38 39 40 41 42 |
var signaturePad; var canvas; $scope.clearCanvas = function() { signaturePad.clear(); }; $scope.saveCanvas = function() { $scope.signature = signaturePad.toDataURL(); $scope.closeSignatureModal(); }; $scope.resizeCanvas = function() { var ratio = 1.0; canvas.width = canvas.offsetWidth * ratio; canvas.height = canvas.offsetHeight * ratio; canvas.getContext('2d').scale(ratio, ratio); }; $scope.showSignatureModal = function() { $ionicModal.fromTemplateUrl("templates/signature.html", { scope: $scope, animation: 'slide-in-up' }).then(function(modal) { $scope.signatureModal = modal; $scope.signatureModal.show(); canvas = angular.element($scope.signatureModal.modalEl).find('canvas')[0]; $scope.resizeCanvas(); signaturePad = new SignaturePad(canvas, { minWidth: 1, maxWidth: 1.5 }); }); }; $scope.closeSignatureModal = function() { $scope.signatureModal.hide(); $scope.signatureModal.remove(); signaturePad = canvas = $scope.signatureModal = null; }; |
Add controller code to save signature
In the above code, signaturePad.toDataURL() will return a string in the format data:image/png;base64,iVBORw0KGg… – so can be easily displayed in signature.html using this template markup;
|
1 2 3 |
<img ng-src="{{signature}}" style="width:100%;" />. |
However, it might be more useful to save just the base64 data to the database so it can be more easily manipulated outside of our app.
In the controller that handles the submitted input form data (in our case the ProjectExpNewCtrl controller), add the following code within the ‘$scope.submitForm’ method (just after the creation of variable ‘varNewExp’):
|
1 2 3 4 5 |
if ($scope.signature) { varNewExp.mobilecaddy1__Expense_Signature__c = $scope.signature.split(",")[1]; } |
This will save the signature’s base64 data to Salesforce. mobilecaddy1__Expense_Signature__c is a ‘Rich Text Area (32768)’ field on object MC_Object_002 within the MobileCaddy package.
You can watch our short quick bite video on adding a new field to a table if you need more information on how to do this.
To display the above field in HTML, use code similar to the following:
|
1 2 3 |
<img ng-src="data:image/jpg;base64,{{mobilecaddy1__Expense_Signature__c}}" /> |