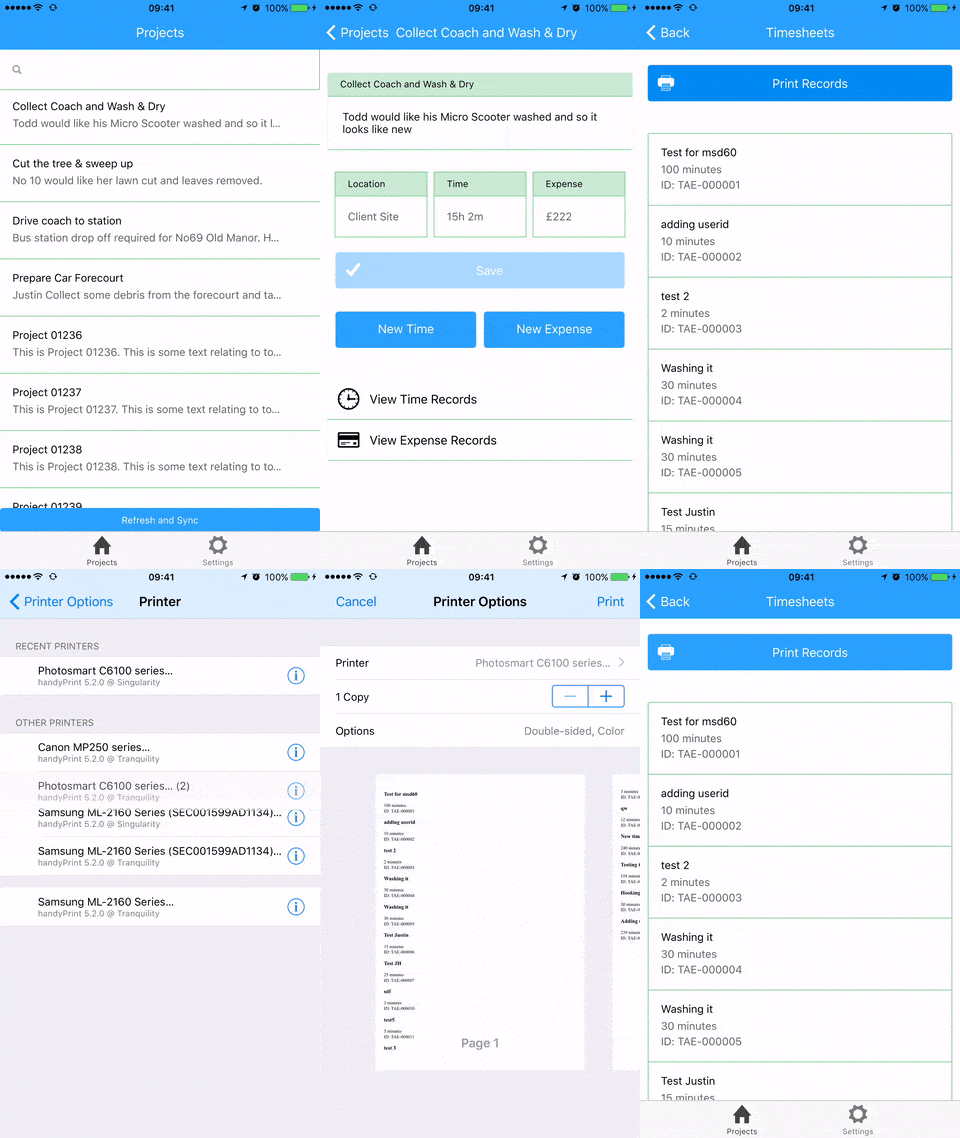
This recipe will show you how easy it is to add Cordova printing capabilities to your application using the Cordova plugin cordova-plugin-printer. This plugin lets you print HTML documents using Apple AirPrint and Android Printing Framework.
For this recipe we will be using the MobileCaddy Time and Expenses seed application to add the ability to print out a list of the expenses of a project, however you can apply these steps to almost any other application.
Installation
If you are using the Time and Expense application, the printing plugin is already installed for you. However, if you need to add it to your application you can view our guide on adding dependencies.
The Code
The printing plugin takes a string or a HTML DOM node and passes it to the underlying native SDK to print. We will be adding the following to the Time and Expenses application to allow us to print the list of expenses that a project has:
- Add a print button on the expenses list
- Add code in the controller to print the page
Add the print button
Add a ‘Print Records’ button to the top of the time and expenses list page by adding the following code after the <ion-content> tag to the projectTimeExpList.html template located in /www/templates:
|
1 2 3 4 5 6 7 8 9 10 11 |
<div class="row"> <div class="col"> <button ngClick="printRecords()" class="button button-block button-positive icon-left ion-printer"> Print Records </button> </div> </div> |
Add code to the controller
The controller for the expenses list template needs to be updated to respond to the button we just added. First we need to inject the plugin to the controller by adding $cordovaPrinter to the array of dependencies. Open the projectExpense.controller.js file located in /www/js/controllers and update the array of dependencies:
|
1 2 3 4 |
ProjectExpenseCtrl.$inject = ['$scope', '$stateParams', 'ProjectService', '$cordovaPrinter']; function ProjectExpenseCtrl($scope, $stateParams, ProjectService, $cordovaPrinter) { |
Next we must add a function to our scope that gets called by the button when it is pressed. This function will call the $cordovaPrint plugin and pass it the list of records that are currently displayed. We will do this by taking the contents of the ion-list node. Add the following code to the controller:
|
1 2 3 4 5 6 7 8 |
$scope.printRecords = function () { var contents = document.getElementsByTagName('ion-list')[0].innerHTML; $cordovaPrinter.print(contents, 'Records', function () { // Printing finished or cancelled. }); }; |
Deploying and testing the print functionality
Since this is a plugin that uses native iOS and Android SDKs, the application must be ran on a device or simulator to work. The easiest way is through the BizCaddy application that you can find on the App Store or Google Play Store.
First, the application must be deployed to your Salesforce organisation. Do this by running the application locally, then navigate to the Settings Tab, Admin Login (default: 123) and finally pressing ‘Deploy to Salesforce’.
Once this is done, launch the BizCaddy app and sign in with the credentials for your organisation. Navigate to a project that has expenses and view the expenses list. Press print and you should be presented the native printing dialogue.

Useful resources
cordova-plugin-printer
Ionic Time and Expenses Seed Application
How to add dependencies
BizCaddy (App Store)
BizCaddy (Google Play Store)
